
 Subscribe vis RSS
Sidewalks ~ Saturday, December 29, 2007
With tracks laid in plastic "pavement", lots laid out, and streets planned (see this earlier post), it's time to make this urban planning a reality by adding some sidewalks, and turning a blank sheet of plastic into streets and real estate.
Evergreen styrene makes sheets with squares scribed in the surface that can be used as "sidewalk" or "tile", depending on the size and your scale. I spent a little while wondering what size of squares would be most appropriate for sidewalks. Looking around my own town, I discovered there's a lot of variety. Some neighborhoods (newer commercial areas, maybe) have 10' squares, but a lot of older neighborhoods have much smaller ones, maybe 2-3'--I didn't use a tape measure, just my feet!
Since I'm setting my layout sometime in the first half of the 20th century, smaller squares seemed better--and might help make my selectively compressed city blocks seem a little bigger, anyway. So I used styrene sheet with 1/8" squares. With this size, six squares conveniently comes out to 10 N scale feet, and I decided that 10' is a reasonable width for a sidewalk.
I cut corners using my x-acto-in-compass tool (described in the previous article about streets). Next I added curbs. The styrene sheet is 0.04" thick, so I used 0.040x0.040 square styrene bar. This picture shows how I glued it on:
Put everything down on a steel sheet, brace everything with magnets, and start welding with plastic solvent (I'm using a gluing jig set from Micro-Mark, but it would be easy to improvise with stuff from hardware and craft stores). Attach the curb strip at the middle of the curve, let that set, bend it a little farther around, weld some more, reposition magnets, wait a bit, and repeat. It's important to start at the middle of a curve. At first, I tried what seemed logical--glue the curb to a straight edge, and work around the curve to the other. But every time, I would get half way, and the curb strip would snap. Starting in the middle of the curve, this just didn't happen.
Here's my one building built so far for this layout test-fitted in an L-shaped corner sidewalk.
For the central block, I made one big sidewalk piece out of two big L's.
Here's everything installed, waiting for painting. The garage sale signs I used for the streets are also styrene, so everything glued together nicely.
It's starting to actually look like a town!
Btw, after getting pretty far into this work, I visited a local train shop, and found a product called Easy Streets by Fine N Scale Products; basically, it's pieces of sidewalk already made up for you. The way I've build sidewalks was not particularly hard, but Easy Streets does have interesting extras like driveway pieces and other bits of detail that I didn't attempt. Definitely worth looking into for anyone else who might attempt and N scale trolley layout.
Switzerland Trip Report Part III - More things to do in Zürich ~ Tuesday, December 25, 2007
We rode the Dolderbahn, a rack railway I mentioned earlier.
At the top is an outdoor ice skating rink. For little ones just learning, they provide these sliding bears that you can hug while trying to skate, to keep from falling.
Ice skating on the top of a mountain in Switzerland is cold, though. Fortunately they provide a cafe. We enjoyed a couple of Irish Coffees. I was warmer after that, and seemed to skate much better, too!
This cathedral is the Frauenkirche.
It has bronze doors with bible scenes illustrated in bas-relief.
If you're brave, you can climb up one of the towers. There's quite a view of the city from the top.
Lean nonchalantly against the railing, get your traveling companion to take your picture... 

...ponder for a moment how impressive it is that medieval masons could build towers hundreds of feet into the air with just stone and mortar, and no steel reinforcement--do they get earthquakes in Switzerland? Back down those stairs!
I also recommend not making the ascent when King Kong is in town!
There are lots of nice shops in Zürich. Here's candy animals from a confectionary.
I found a train shop downtown. They had some nice (and pricey!) HO tram models in the window. I couldn't find much of anything in N. I bought a German language magazine for practice.
I had more fun at Pastorini, a really fabulous toy store--some of our purchases there have just been unwrapped, and seem to be a hit!
Around town, we saw people eating this strange concoction...
It looks like ground beef, but it's actually chestnuts cooked and squeezed into spaghetti, and called vermicelles. They put cream on top of it, and it's actually pretty good.
Did I mention it was really cold? Here's proof. That fountain is frozen!
But a nice thing to do in cold weather is candle-dipping. A tent is set up on Bürkliplatz specifically for this (see their website). Locals seem to take this very seriously. It's downtown, and some people come here regularly during lunch to work on their candles. You can leave candles in the Kerzengarderobe and come back to work on them more later, and eventually make a pretty huge candle--or you can just keep at it for an hour or so and get a fairly respectable, normal sized candle.
We rounded out our visit with more ice skating. This temporary rink is set up seasonally by the lake--the ice was pretty rough but the scenery was great!
You don't have to ride trams to see all this stuff, but I recommend it!
This is where you stand to ring the "secret back-up bell", btw!
More to come...
More Vintage San Francisco on YouTube ~
Here's Market Street in 1941:
http://www.youtube.com/watch?v=wzqs6DF_wGE.
There are four tracks on Market Street, for the private Market Street Railway (white front cars) and the Municipal Railway (some cars gray, some blue and yellow). It would be another three years before the former would be acquired by the latter.
Downtown was a lot more human-scaled back then.
I'm kind of sorry to have missed the era of ubiquitous hats!
Merry Christmas, everybody!
Switzerland Trip Report Part II - Zürich Trams ~ Friday, December 07, 2007
Our first stop in Switzerland was in Zürich. We stayed with a high-school friend of my wife and her family, who live in an apartment overlooking an intersection where three tram lines meet up in front of the lower station of a rack railway.
Our hosts were concerned we would have trouble sleeping because of the noise. That wasn't a problem, but I did have trouble putting away my camera.


The flat-roofed trams are the backbone of the current fleet; the round-roofed ones are an older model, slightly less common, but still easy to find. Both types usually operate in trains, either of two complete articulated trams of the same type coupled together, or of one articulated tram followed by a similarly-styled single-section car with no cab (I'm not sure if they're MU'ed or trailers).
Most cars are in the blue and white scheme (the colors of the Canton of Zürich), but a few have been ad-wrapped.

The newest members of the fleet are five-segment articulated, low-floor trams called "cobras".
They are popular with moms who use strollers!
The rack railway is called the Dolderbahn. It operates as part of the Zürich transit network. At the top of the mountain is an outdoor ice rink. We went at night and froze (it was probably below freezing) but there was a nice cafe and fortified by Irish Coffee we could brave the cold--somehow I started skating better, too!
The Dolderbahn was originally constructed as a funicular, and still has a funicular style of operation, with two cars operating in opposite directions and getting around each other with a passing track in the middle. The current cars are like boxy trams. They are probably somewhat vintage, judging by the diamond pantographs.
One last bit of notable Zürcher transit, which was just beginning it's seasonal run as we finished up our trip, is the Märlitram--which only accepts passengers up to the age of 10!
I also got a quick glimpse of another vintage single trucker, but had no time to take a picture. Next time we'll visit during the summer, when the Tram Museum Zürich runs vintage cars on a "museum line" through the city.
One interesting discovery about Zürich trams--for backup moves in the yard, there is a button on the floor in the rear which rings a bell--and nothing to stop passengers from ringing it!
I should have made more movies, but here's a quick one.
Switzerland Trip Report Part I - Travel Tips ~ Monday, December 03, 2007
Well, I'm back stateside, and getting a couple of GB of photos organized, not a few of them containing trams, electric railways, funiculars, and rack railways...
Before I start posting them, here's a few general observations about visiting Switzerland.
- Flying via Swissair is definitely the least awful way I've ever crossed the pond.
- Getting a "Swiss Pass" is a great deal, even if you don't plan to spend every moment of your vacation riding trains. You can ride just about anything--long distance trains, local transit, ferries, and rural "postbusses". You can get a "family card" so that kids can travel with you, for free. You also get into just about every museum in the country.
- November is kind of a dead month for Swiss tourism. This was fine for us, since we were visiting friends and family, and the "ordinary" transit that runs year-round is pretty interesting anyway. But actual museum railways shut down after September, and snow-oriented resorts don't open til December, so if either of those are high on your to-do list, keep that in mind.
- The Coop chain is a good place to get supplies while you're there--stores signed Coop City have buffets upstairs--very useful because relatively casual, cheap, quick and kid-friendly places to eat are actually kind of scarce.
- If younger members of your party balk at the local food, there's plenty of pizza/"Margherita" places around. If you get tired of the local food, Turkish places are a good way to take a break, and they're usually cheap.
- People in the French part of Switzerland don't speak English much--or even German, even though they're all supposed to learn it to graduate from high school! I did OK in the German areas using very rusty German--nobody seemed to have any trouble switching from Swiss German to standard to talk to me.
- If your're on any kind of a diet, forget it. "Low fat" milk is 3.4%, and they just plain don't have it fat-free. Not to mention, you're going to end up eating lots of croissants (locally, "gipfeli"). See lots of stuff, climb a few mountains, and walk it off!
- If you're visiting people, especially American expatriates, peanut butter and Tobasco are nice things to bring that you just can't get there.
- The trains really do run on time--and they're scheduled so that connections work well. Wow!
Off to Switzerland ~ Thursday, November 15, 2007
I'm leaving tomorrow!
I told my family I don't care where we go, as long as we ride trams to get there.
Watch for me here!
Electric Railway Handbook Online ~ Sunday, November 04, 2007
Another useful historical document online, the Electric Railway Handbook is online at Google Books.
This is a refernece for engineers in the field from 1915.
The Electric Railway Journal (see my Previous Post), which seemed to disappear from Archive.org as soon as I mentioned it here, seems to be back up.
Pumpkin Patch ~ Wednesday, October 31, 2007
A few months ago, I ordered some vehicle kits from an online source. Gotta fill up those streets! One of them, a Lineside Models pickup truck, was a kind of borderline casting--one of the rear wheel fenders was only half present, and the front was kind of askew. The best way of salvaging it seemed like some kind of kitbash. If I made it into a flatbed truck, I could get rid of the rear fenders entirely.
This idea didn't lead to any action immediately. Then a few things began to converge. As I mentioned in a previous post, I am planing the urban end of my layout around standardized-sized (30x20') lots with interchangeable structures and other scenic "mini-modules". As the year rolled around to fall, it occurred to me--how about a pumpkin patch... with a truck full of pumpkins?
I cut away the rear fenders, re-bent the front end into something passably even, and held it in place by gluing a piece of styrene underneath. Then I built up a frame for the flatbed from styrene strip.
After covering the flatbed frame with wood, painting the truck, and adding a pumpkin--I decided to put one really big prize-winner in there instead of a bunch of little ones--here's what I got.
The pumpkin is made out of Sculpey III, a modeling clay. Actually I made a lot of pumpkins, most of them tiny. Here's about half of them:
The booth is scratchbuilt; the fence is Plastruct railing.
I still need to add some straw, some weeds, maybe a little corral/petting zoo with goats, and a bunch of figures--especially kids!
Turning to 1:1 scale... a local pumpkin patch had this cool green pumpkin. Actually I think it just wasn't ripe yet. When I bought it, it was green all over. The side that got more sun turned orange.
I carved out a spider, and "etched" a web. With a candle inside it looks like this:
For another Halloween decoration, I painted a wooden cat silhouette black, drilled holes for eyes, put two low-voltage lightbulbs in them, and wired them to a 9v battery.
Happy Halloween, everybody!
Rio Grande in San Jose ~ Wednesday, October 24, 2007
This diesel has traveled a bit in it's career--that's the San Jose Sharks arena in the background (the SJ Amtrak/CalTrain/ACE station is just to the right).
This is an upside of mergers, for fans, even if it's temporary.
These two units are the usual power on a lot of freight jobs up and down the peninsula on the ex-SP, now CalTrain, line--quite a bit of which is to and from the port of Redwood City (my town).
Light Rail in a Light Rain ~ Tuesday, October 16, 2007
Yes, it does rain in California. Nothing very heavy so far this year.
I don't get much chance to take pictures of trains in the rain, so I took a few waiting for the train home. Here's some shots of the railway next door, the VTA light rail:

And here's my ride, CalTrain.
Growing a City: DPW and Zoning ~
With my street trackage embedded in Tomix plastic paving block sections, it was time to bring the rest of the street up to grade.
I mulled over several ways of doing this. I could fill the space in with plaster or some other pourable material, but one of my objectives in building this layout is to make it disassembleable for maintenance (or for recycling for my next layout). I could cut foam board (it's available in thicknesses that would match pretty well) but I wasn't sure I could cut it precisely enough.
One day walking home I noticed a cheap source of large plastic sheet. In fact, the first sample was free (the date of the sale had already gone by):
I found more signs at a hardware store for about a buck each. I'm pretty sure they're made of polystyrene, just like all those model kits, and if you don't mind that they're painted on one side, this is a cheaper way to get big sheets of thin stock than through the usual hobby suppliers.
To raise the plastic sheet to a level even with the railhead, and to hold the track in position exactly where I want it (I don't really need to even nail or glue it down now, although a few drops here and there might help keep it in place during "extreme handling" such as turning the layout upside down to work on wiring) I made a frame of 3/16" thick balsa strips.
Cutting the plastic sheet to fit neatly around the curves of the tracks was tricky. At first I tried just using the track (or rather, the plastic paving block sections attached to the track) to trace a cut, but had trouble holding everything steadily enough to pull that off, and I was a bit nervous that weights or clamps might damage things.
Eventually I used a cutting compas. I think you can buy those ready-made, but I improvised one by clamping an X-Acto knife into a drawing compas.
In thinking this up I had imagined that this tool would miraculously make perfect cuts every time, but it was still somewhat fiddly. The blade has a tendancy to spiral in or out that's hard to fight. I got best results by cutting out quarters circles as separate pieces, and making the arc with a series of very light very short cuts, which I later retraced by hand, and then snapped apart, rather than one long heavy cut.
You could probably improve on this tool by getting another nut to secure the pointer end onto the screw from both the inside and the outside, making it more rigid. Next time!
After that, I smoothed out some rough spots, and the overall fit was pretty good.
There's still a few gaps, but if I make sure that everything underneath is painted darkly, I don't think they'll be too obvious.
My layout has one definite advantage over real streetcar lines in that I laid down my track first, and get to decide exactly how to fit streets and city blocks around them later. I used paper, pencil, and X-Acto to make "two dimensional mockups" of city plans, and try different-sized lots until I found a plan that worked.
I'm basing it around lots that are 30' wide and 20' deep. I guess that's a good example of selective compression--realistically-sized storefronts in front of buildings that are pretty unrealistically shallow. It's enough room to build a diorama of a shop behind the windows, if I want to go for interior detailing, without a bunch of space for a store-room in back that nobody would ever see unless they took off the roof.
There's a couple of advantages to this. I can fit something that looks like a genuine downtown city block in a pretty tiny space. It also makes the buildings well-suited to recycling on a shelf-style layout, which I think my next one is likely to be. It also makes this layout easily changeable.
My plan is to build up a collection of buildings or other scenic elements that fit in these standard lots, and swap them in and out as the mood strikes, perhaps even changing eras in the process. The corner areas I've laid out at the edges of the layout also have 20x30' lots; a lot of the time these will have "mini-parks", that will not block the view of the street, but sometimes they might also get swapped out with buildings to make the whole scene more urban. No reason there can't be a park in the middle of a block (or an empty lot full of junk, for that matter).
With the land subdivided and zoning ordinances passed, developers were anxious to start building. I visited Tom's Trackside Trains (pretty much the best place in the SF Bay Area for hard-core N-Scalers), and started looking for a likely kit to fill one of my lots. DPM's "Roadkill Cafe" turned out to be just about 29' wide, so a depth-shortened version of this kit is now the first building in downtown Winifred (and the first structure I've built specifically for this layout).
Coming soon: overhead! Just as soon as I install the sidewalks and paint the sceneray, which I'll get to just as soon as it stops raining!
Electric Railway Journal On-Line ~ Sunday, October 14, 2007
In the "Americana" collection at Archive.Org; here's a direct link.
This is the trade journal of the real life street/electric railway industry, from it's heyday. A pretty neat resource to have online.
Train Time at Mountain View ~
Waiting for my train (CalTrain) at Mountain View, CA, I decided to play with the movie feature for my (normally still-photo) digital camera.
The VTA Light Rail connects with CalTrain at Mountain View. Here's a batch of newly arrived passengers alighting and running over to connect with a northbound CalTrain train.
And moments later, the light rail train zips off, starting it's roundabout run to San Jose and Campbell.
Winchester refers to Winchester Blvd, which runs by the world-famous Winchester Mystery House.
Yellow Pages Train ~ Friday, September 14, 2007
This was my ride home yesterday.
I kinda like it. Anyway, variety is good. I'm just glad they didn't paint over the engineer's window.
A "wrapped" LRV would make an interesting modeling challenge.
Painting Tracks and Kitbashing Streets ~ Thursday, September 13, 2007
All the model train magazines say you should paint your track, so I did, at least on the parts of the layout where track will be in the open (not in streets). Tomix track already has black ties on a fairly reasonable (for brand new) gray ballast, though of course the whole thing looks pretty plasticky. I painted the ties and ballast with the "dirt" colored paint from the Floquil model railroad weather coloring set. I didn't dilute it, but it's thin enough that the underlying color differences show through. I painted the rails "rust", making sure not to gum up the turnouts, and wiped the paint off of the head of the rails.
Everything still works (whew!) and the effect is worth the effort.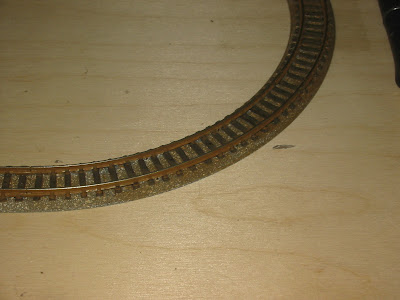
Tomix's street pavement pieces are really nice. You can snap the pieces that go outside of the rails to the track with little plastic clips that they provide. The inside pieces just lie there. I want them to stay there reliably, but still be removable, so I glued (with plastic-welding solvent) them together end-to-end (but not to the track), so at least they don't just pop out individually if they're bumped. I also glued the outside pieces together, though that isn't really necessary. When I'm really to make things more permanent, I'll glue all the street pieces down, but instead of using solvent I'll put on a few dabs of craft glue so everything can be (non-destructively) disassembled if need be (a suggestion from fellow online modelers).
Tomix provides track pieces for turnouts, but they leave the area around the switchpoints uncovered. This is actually prototypical for some modern light rail lines which run in reserved medians, and pave over the tracks anyway (for maintenance trucks, I guess) but leave turnouts exposed. If you're modeling old fashioned streetcar tracks, though, it just looks like you have a gaping hole in the road--but this is something that can be improved on.
Here's the instruction sheet that comes with the Tomix street pieces.
First, I took two of the tiny triangles you're supposed to put between the frog and the points (C-20, and it's left-hand-turnout counterpart), and used them to fill the triangle-shaped gaps on the outside of this area. Then I cut down an extra straight between-the-rails section to fit around the points. Fitting these pieces in requires a lot of careful cutting and sanding, and when you're done, they won't really sit there very well by themselves, so I glued them to the oddly shaped pieces that lead up to the turnout (C-21, C-22, C-23). Everything is still removable.
I also filled in part of the gap around the turnout slider handle in C-14.
Now that looks like old-fashioned, trolley car "specialwork"!
Next up I need to paint all these pieces, and build up the rest of the street.