
 Subscribe vis RSS
Painting Tracks and Kitbashing Streets ~ Thursday, September 13, 2007
All the model train magazines say you should paint your track, so I did, at least on the parts of the layout where track will be in the open (not in streets). Tomix track already has black ties on a fairly reasonable (for brand new) gray ballast, though of course the whole thing looks pretty plasticky. I painted the ties and ballast with the "dirt" colored paint from the Floquil model railroad weather coloring set. I didn't dilute it, but it's thin enough that the underlying color differences show through. I painted the rails "rust", making sure not to gum up the turnouts, and wiped the paint off of the head of the rails.
Everything still works (whew!) and the effect is worth the effort.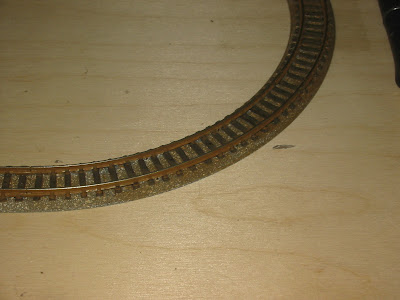
Tomix's street pavement pieces are really nice. You can snap the pieces that go outside of the rails to the track with little plastic clips that they provide. The inside pieces just lie there. I want them to stay there reliably, but still be removable, so I glued (with plastic-welding solvent) them together end-to-end (but not to the track), so at least they don't just pop out individually if they're bumped. I also glued the outside pieces together, though that isn't really necessary. When I'm really to make things more permanent, I'll glue all the street pieces down, but instead of using solvent I'll put on a few dabs of craft glue so everything can be (non-destructively) disassembled if need be (a suggestion from fellow online modelers).
Tomix provides track pieces for turnouts, but they leave the area around the switchpoints uncovered. This is actually prototypical for some modern light rail lines which run in reserved medians, and pave over the tracks anyway (for maintenance trucks, I guess) but leave turnouts exposed. If you're modeling old fashioned streetcar tracks, though, it just looks like you have a gaping hole in the road--but this is something that can be improved on.
Here's the instruction sheet that comes with the Tomix street pieces.
First, I took two of the tiny triangles you're supposed to put between the frog and the points (C-20, and it's left-hand-turnout counterpart), and used them to fill the triangle-shaped gaps on the outside of this area. Then I cut down an extra straight between-the-rails section to fit around the points. Fitting these pieces in requires a lot of careful cutting and sanding, and when you're done, they won't really sit there very well by themselves, so I glued them to the oddly shaped pieces that lead up to the turnout (C-21, C-22, C-23). Everything is still removable.
I also filled in part of the gap around the turnout slider handle in C-14.
Now that looks like old-fashioned, trolley car "specialwork"!
Next up I need to paint all these pieces, and build up the rest of the street.