
 Subscribe vis RSS
Some Rubber-Tired Prototypes ~ Monday, November 06, 2006
Some friends of mine are members of the Early Ford V8 Club. Here's some pictures from a recent get-together at their ranch.
direct linkChecking up on Some Old Friends ~ Tuesday, October 31, 2006
Last Sunday the family and I visited the Western Railway Museum at Rio Vista Jct, CA.
We rode a Key System Bridge Unit to a pumpkin patch. These originally ran over the Bay Bridge from Oakland to San Francisco. Considering they were built in the 1930's, these articulated cars are strikingly modern looking.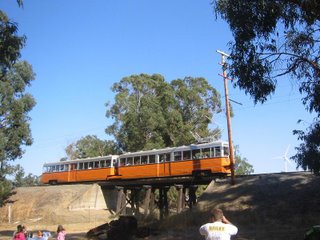
Other than the older style of pantograph, they look a lot like modern LRV's. Modern LRV's don't have leather seats, though! One oddity of their design is that the two halves are different lengths. It's kind of hidden by perspective in this picture, but count the windows. I've heard this was to done to dampen oscillations that it was feared might get the whole bridge swinging!
Parked outside of the barn was a a Muni PCC which I understand has gotten a little much-needed TLC lately. This is a prototype I'm hoping to build a model of some time, and I've never gotten a chance to see it outside before, so I did not miss the chance to take lots of pictures, which I'll include one of here.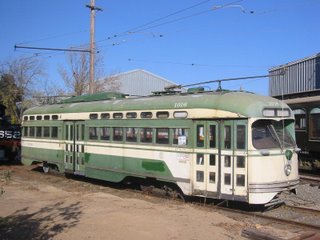
Another PCC was parked in the barn, with a caboose conveniently on the next track over, very nice for getting a look at the roof.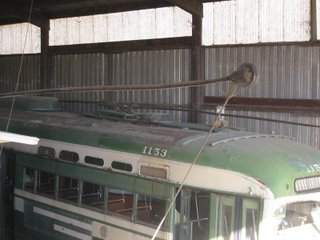
It's a fundamental paradox of modelling that roofs are seldom seen in real life but quite visible on a model, and we're often left scratching our heads what exactly to put up there. SF Muni PCC's are somewhat unique in having poles on the front end and all the usual hardware that goes with them, and this shot, whatever it's deficiencies as photographic art, is going to be quite useful in getting all of these details right.
We stopped by a few other favories, like this Salt Lake & Utah interurban observation car, which for various reasons we suspect may be haunted!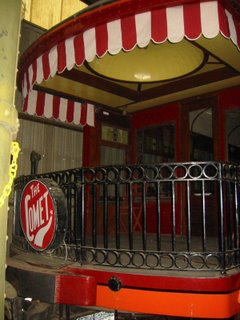
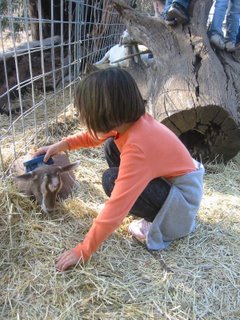
There were non-trolley things to do too, such as a giant mountain of haybales with an innertube to jump on on top, and cute farm animals to pet. I also did a little early x-mas shopping. I hope everybody likes pumpkin butter!
To me, at least, the best thing about the WRM is that it lets you experience actually riding an interurban, along a couple of miles of tracks under wire.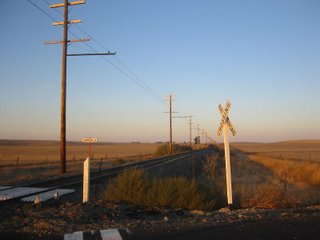
That's it for this time. I'm keeping up the modeling, but not much to show for it yet... stay tuned.
Inspiration ~ Saturday, October 28, 2006
None of it's N Scale, but check out this Special Traction Edition of Carl Arendt's Small Layout Scrapbook, featuring several inspirational micro traction layouts.
direct linkTwo Tiny Trolleys III: Drilling Holes for Fun ~ Thursday, October 12, 2006
Since the mechanism I'm building for my two tiny trolleys project is centered around a chassis built from brass bar stock, I've been trying my hand at some light metalworking.
I started by cutting some 1/2" wide x 1/8" thick bar stock to about 2 3/8" "blanks", just by putting it into a vise and going at it with a hacksaw. Ultimately, each of the mechanisms I'm building will use two of these each, but I cut some extras, since I got a little more precise in my sawing as I went along and I wanted some extra material for practice drilling.
I'll be making one large hole for the truck gear tower to stick up through, and a few small ones for holding everything together. The main tool for doing this is a drill press built around a Dremel motor tool.
A couple of years ago, in anticipation of trying things like this, I bought a Dremel drill press stand. This was one of those "I don't need this now, but I just got a raise and I'm gonna buy myself something" kind of purchases. Needless to say, it sat in the box for a couple of years.
So a week or so ago I actually set it up and stuck it on my workbench with C-clamps. After playing with it a little, I was a bit disappointed, because it had some play that I just couldn't get rid of, even after resorting to reading the manual. Making holes exactly where you want them is kind of the whole point of a drill press. Of course, way too much time has elapsed to try to go back to the hardware store and try to exchange it.
Now sometime in the intervening years, my Dad, who has been redoing all the cabinets in my parents' kitchen (and they look really nice now, too), upgraded some of his tools and gave me his old Craftsman drill press stand. Even though it's designed for a different and much bigger drill, I noticed that it was almost identical to my Dremel stand, except for having a lot of metal parts where mine has plastic. So I ended up combining the piece that actually holds the motor tool from my new stand with the mechanism from the old one, cleaned off a couple decades of sawdust, and ended up with a pretty good drill press.
At first I tried clamping my workpiece down with nuts and bolts, but unfastening and refastening them all whenever I wanted to move it was a pain, so now I'm just putting the brass bar stock in a big vise I can shove around when I need to, but is heavy enough that it's not going to move by itself when I'm drilling.
One more note: I'm safety concious enough that I new better than to try all this without eye protections, but learned the hard way that you need to protect your ears too. The first time I tried drilling brass, ended up with a headach that lasted the rest of the evening. Just using foam earplugs makes it a lot more bearable.
So here's my "shop" so far:
In other news, I got ahold of another motor to supplement the one that came with the Atlas RS-1. It's a replacement motor for some Atlas/Kato diesel, with about the same overall dimensions, and most importantly, the same shaft diameter. I found it at "The Train Shop" in Santa Clara, CA--a good place for tools, parts, and other train goodies in the the south bay area.
Cool Streetcar Pictures--from the Patent Office? ~ Thursday, September 28, 2006
An interesting source of historical techincal information, but one little-used by railfans, is the U.S. Patent Office. At http://www.uspto.gov, you can search for patents and look at scans of the text and drawings.
Unfortunately, finding really old patents is kind of tricky, because the patent office has only scanned them as images, so you can't do keyword searches on them. If you know the number of a patent from some other reference, you can jump right to it, but otherwise you'll need to be clever to find things.
One way to go about it is through citations. Like academic papers, Patents cite "prior art", earlier patents that describe existing solutions to whatever problem they're trying to solve. So if you can find a relatively recent patent through keyword searches, its references might lead you back to something in the era you're interesing, and the Patent Office website makes it easy to follow them; in patents stored as text, references to older patents are links you can click on.
When you finally find a patent you want to look at, the images are in TIFF format, which browsers do not always support. I installed a AlternaTIFF which let me see them.
So here's a few pictures I've downloaded. The first is from Patent No. 1,617,761 "Safety Car"; it central claim is that by paiting the front of a streetcar white, and shining lights on it, its visibility and safety will be improved. It is a nice drawing of a car of the Market Street Railway of San Francisco, the company which invented and used this idea:
Here's a more technical one, from Patent No. 1,138,357 "Car Truck", which is Brill's patent on their "Radiax" truck:
Here's two drawings from patents by Andrew Hallidie, inventor of the cable car, describing details of wire ropes (No. 339,646) and grips (No 610,353):

Cable cars are well covered by patents. In the 1870's and 80's, cable cars were the latest high tech industry, and one that companies were keen to control through what we now call "intellectual property".
Have fun, and while you're at it, check out some of my patents if you want.
Two Tiny Trolleys II: Planning a Mechanism ~ Monday, September 25, 2006
I've been wrapping up work on the bodies of my two trolleys (see this previous post); I just added steps at each of the doors. Now it's time to turn to the really "interesting" (a.k.a., "hard") part of this project, building mechanism for them.
The mechanical parts--trucks, gears, worms, flywheels, and one motor, that I'll be using are from an Atlas RS-1. For the second motor I'll try to get a compatible (in terms of size and shaft diameter) can motor from a supplier like Roundbell Hobby Products.
To put all this together, I'll start with floors made of brass bar stock. There will be another brass bar on top for mounting the trolley pole, and generally to add weight.
Here's a drawing I came up with in PowerPoint while I was waiting for the train:
The motor will be wired for two-rail operation; the pole will be wired to the headlights, so that the car will have directional, continuous lighting (or better yet the lights can flicker realistically when the car goes past a dead spot in the overhead, just like MUNI PCC's did when I was a kid, without stalling out the motor).
Vote for MSR 798! ~ Tuesday, September 19, 2006
A local (that is, S.F. Bay Area) historical preservation agency is choosing projects to fund by letting people vote for them on the internet.
I'm voting for Market Street Ry. car no 798, and encourage my fellow trolley fans to log in and do so too!
To vote, go to the Partners in Preservation website (you will have to register). 798 is listed as "San Francisco Streetcar 798" in the pulldown list ballot.
For more info on car 798, take a look at the (modern) Market Street Ry.'s website (the new MSR is a streetcar restoration group which works with San Francisco's MUNI to support the F line; they are named after the historical MSR, a former, privately-owned streetcar company, originally a competitor to the MUNI and later merged into it).
As you might guess from the checkered MUNI/MSR logos I'm using as my background on this blog, this is one of my favorite streetcars. If it wins this grant, we might all be able to take a ride on it someday soon!
End Table Inspiration ~ Sunday, September 17, 2006
NCat modeler Alex Postpischil built a layout in a glass-topped end-table layout a few years ago. This was part of the inspiration for my current project. Alex has just uploaded some pictures of his layout, plus a scan of an NCat New article about it, to the NScaleTraction listgroup photo album (click on "Al's Projects").
direct linkDocument your Favorite Line in Wikipedia ~ Friday, September 15, 2006
I just wrote a quick article on the Pacific Coast Railway, a partially electrified narrow gauge line which formerly ran in the Central Coast of California.
This is a great way to get a quick write-up online of your favorite shortline, streetcar company, or interurban, especially those obscure ones that don't have their own dedicated historical societies of webpages.
Micro Layout Update: Thoughs about Turnouts, and Lots and Lots of Sanding ~ Monday, September 11, 2006
Thanks to the guys on the NScaleTraction listgroup, it's come to my attention that there may actually be commercial turnouts with small enough radii to work for this layout. They're made by Tomix, and are hard to find in the U.S., but Japanese Model Supplies may import them, as well as Mokei Imports (no webpage).
Meanwhile, I stopped by a local hobby shop, Tom's Trackside Trains, in Burlingame, CA (close to the Millbrae BART/CalTrain station, and the place in the Bay Area for obscure, hard-core N scale stuff), and picked up some Micro Engineering code 55 rail. It's pretty cheap, so I want to at least find out for myself if I can handlay track. If I actually pull it off, I can have exactly the trackplan I want, build track that really looks like streetcar track, and get the reliability of live frogs.
Meanwhile I picked up some short pieces of oak to build the top window frame for my table, and started sanding the varnish off of the table proper. The bare wood looks better, and matches the new parts I'm adding. Still, it's slow going, but it's kind of therapeutic and guarantees I'll spend a good long time thinking about what to do next, which should in theory improve my chances of success.
Micro Layout Idea ~ Tuesday, August 29, 2006
A sign appeared down the street, reading "free stuff". We have not come up so far in the world that the offer of "free stuff" does not beckon. In fact, there's still quite a few pieces of furniture around the house that date to our scroungy college days, and a look at what was being offfered free showed that some of these cast-offs would actually be a trade-up over what we had.
While I was loading up a couple of nice things I noticed a fairly neglected, beat-up piece of furniture, a small square end/corner table, I don't know what you call it, with a drawer, and a top that was working loose. Whenever I see a table like this, I think about the possibilties of putting a window in the top, and building a micro-size layout in the drawer.
As I looked over this particular table, I considered various factors:
- It was really small. A layout small enough to fit inside would be a technical challenge, but maybe I might actually finish it.
- At least it wouldn't take up much room in the meantime.
- It was in reasonably fair condition, except for the loose top, actually an advantage, since I'd have to remove it anyway.
- It was free.
So as you can surmise, it's now in my garage, and I've been pondering what to do with it. Here it is:
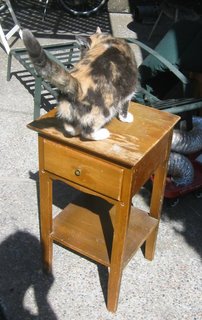
It's always nice when family members get involved in your hobby!
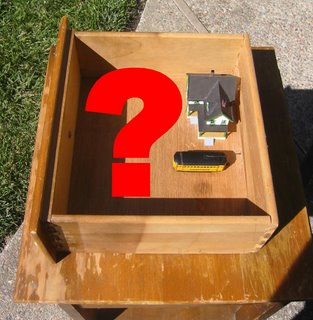
Actually there's more space to work with than I originally though. The inside dimensions of the drawer were 9" width x 8" depth, but when I took the top off, I realized that the table actually had another 3" or so of depth that the drawer didn't take up. As I considered the carpentry that would be involved in lengthening the drawer, I suddenly realized that I didn't really need it. Why not build a layout to fill the entire space where the drawer was supposed to slide, which is about 10" wide and 12" deep? The front opening where the drawer used to slide out could be turned into another window, and while I'm at it, why not replace the side and back panels with windows too?
So now, with almost a square foot to work with, I can start thinking about building an actual layout. Model Power "Brill" single truck trolleys will reportedly take about a 2.5" radius curve. Playing it safe and making 3" my minimum radius, I can fit a trackplan that's minimalist but still has some operational interest.
After looking at Carl Arendt's excellent Micro Layout Scrapbook a bit, I decided on a basic loop plan with a barn to one side, and a stub siding inside the loop. This will allow a couple of cars to take turns running in circles, and maybe give a a work motor a chance to drop off a load of supplies now and then for track and overhead maintenance.

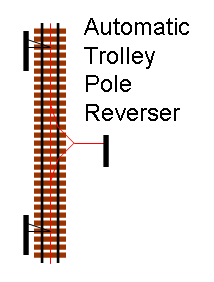
A pole reverser is a trick that allows double-ended, single-pole cars with to reverse direction and get their poles turned around automatically. They were once common in prototype systems in the U.K. It basically amounts to having he overhead for a wye without the tracks underneath.
There's a couple of real challenges to building this project; the first is building overhead that works reliably enough that I won't have to constantly open the table to rewire errant poles. The turnouts are another: I haven't found any small enough to fit this plan, so I'll probably have to build them myself.
On the other hand, when it comes to scenery, we're just talking about four or five buildings, a couple of trees, and some grass. This part at least, I think I can handle! direct link
On the Workbench: Two Tiny Trolleys, Bodywork ~ Monday, July 31, 2006
These days we tend to think of streetcars as a pretty urban phenomenon, but this wasn't always so.
After a long pause I've recently resumed work on a pair of cars that are intended to represent the fleet of a small-town trolley system. The idea is that, like a lot of these systems, the Winifred Transit Company picked up a few used cars from big cities that had outgrown them. Despite their diverse origins, they took on more and more of a family resemblences as years passed and modificaitons were made in the company's shops.
Here's the highly kitbashed, but as-of-yet unpowered and unfinished bodies of my models; the car on the left is a modified Model Power "Brill" (actually based on a locally-built Toronto Transit prototype; see plans in June '72 MR, also uploaded to the NScaleTraction Yahoogroups files area); the car on the right is made from from a Bachmann Brill.
Two Tiny Trolleys
When I compared the dimensions of the Model Power car to the drawings in MR, I found that it was a bit overscale--too tall, and too wide. I decided to live with the extra width, but shortened it vertically, by putting some sandpaper on a flat surface and sanding off a scale foot or so from the bottoms of all sides. This also got rid of the cast-on girder that the model has only on one side (odd, but correct to the prototype).
The Bachmann car is also somewhat larger than scale, and to my eye, the ends looked way too tall and skinny. After I shortened the car by three windows, I cut off the angled buffer from the bottoms of the ends, and built up flat platforms that jutt out a bit. This changed the overall look quite a bit, making it more too my liking (I didn't have any specific prototype to go on, but I have an old HO Tyco trolley and used this as a rough guide). I built similar end platforms for the MP car.
Since I'm imagining that these cars have been converted for one-man operation, I rebuilt them into a Birney-style configuration, with doors in two corners (the ones that would be front-right/back-left depending on which way the car is going), and the doorways in the opposite corners closed off with boards up to the belt rail. The doors were scratchbuilt--a NWSL chopper helped a lot with this.
Other detail changes were the addition of roofwalk/trolley-boards to the MP car, to make it match the Bachmann, and replacing the cast on headlight housings with brass tube on both of them. Still to be added are roof-mounted bells, poles, and pole hooks.
I haven't found an easy way to power these cars; my plans are to build up a mechanism with parts from an Atlas RS-1. Here's some "builder's photo" style side views of the cars resting on one of the RS-1 trucks: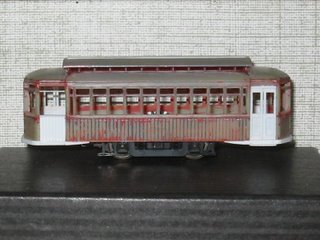
The Model Power/TTC Car
The Bachmann/Brill Car
There are lots of prototypes for little single-truck trolleys like this; here's a picture of a Kansas City Public Service car, at a museum in Ohio (Jerry Appleman Collection), and here's one of a surviving TTC car, No. 1706, at the Shore Line Trolley Museum (Daves Railpix/Bill Volkmer Collection).
And here's a few pictures of NOPSI/RTA car No. 29 that I snapped at New Orleans' Carollton barn (which I'm happy to report narrowly avoided flooding during Hurricane Katrina) a few years ago:

Note the cut-away side, due to the car's use as a rail-grinder
Spring Switches ~ Sunday, July 09, 2006
I'm using spring switches to automatically route trolleys to the right as they enter the double track section. This both allows cars going opposite directions to pass each other wihout anyone having to throw a switch, it also keeps them on the legal side of the street to avoid head on collisions with imaginary auto traffic.
To make this work, the first step is to modify your switches so that they can move freely. I used Peco Insulfrog small radius switches, and there's a little spring that normally makes the switch "snap" to one side or the other, and stick ther unless you apply quite a lot of force to push it the other way. I took these out.
The spring action is actually done with weights on strings instead of springs. Since there will be times when I'll want to run cars or trains the "wrong" way, I routed the strings to front of the layout where they can be pulled to temporarily pull the switch the opposite-than-usual direction. I had trouble finding anything to use as a handle on this end of the strings that was light enough not to interfere with the spring action; eventually I raided some of my daughter's "hair scrunchies".
 |  |
The Layout Already ~ Saturday, July 08, 2006
In lieu of a trackplan, here's a shot taken from a ladder, cropped to minimize your view of my messy garage.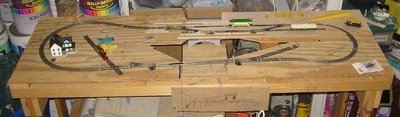
It's a basic loop. The left side is "country", the right is "city"--note the street trackage in the back right, which will be "downtown" with false front buildings. The diagonally crossing track at the left edge of the layout represents a steam-road interchange, and squeezed between it and the downtown area will be a barn. The front right area will be a park with a bandstand, etc.
The double track section will allow clockwise-running and counter-clockwise trains to meet and get around each other, and will also allow run-around moves for switching freight cars.
Wiring for the layout is organized around an power bus along the back edge, with feeders to the rails (and when I build it, the overhead) as needed. Black goes to the outside rail, green to the inside, the overhead will be red.
Rubber-Tired Models ~ Wednesday, June 28, 2006
Any trolley layout is going to have street scenes, and for those you need lots of vehicles--cars, trucks, buggies, whatever.
There's a lot of pretty nice kits for these out there, and they make nice little self-contained projects you can take on when you're short of time or space or money. Here's a few I've built over the years.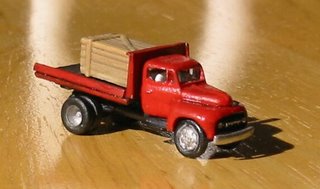
This is Chevy Truck from a kit by a company called CnC or C&C Softmetal Castings, now I think out of business. This was the first model I built after a gap lasting from high school to grad school, so I was pretty happy with how it came out.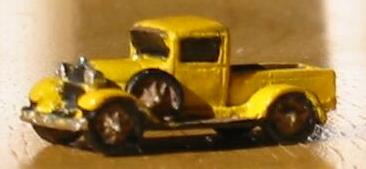
This Model A truck is a one-piece pewter casting by Detail Associates. With some careful brushpainting, they make up nicely.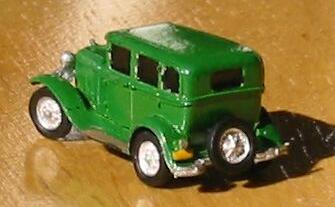
Here's another Model A variant, from a GHQ kit. Defintely more detail on this version.
This Milk Wagon is from a Musket Miniatures/Rustic Rails kit, and is destined to go by a rural freight platform on an interurban line some day.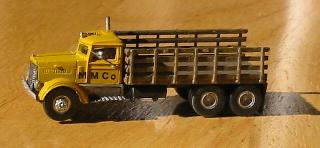
A Peterbilt truck from another GHQ kit. Even more detail parts on this one. The side mirrors that came with the kit were too fiddly, so I made new ones with bits of wire and pin-heads.
I added some finger-nail decals to this VW beetle, then added a little "mud" paint to give it a Hippie road trip look.
Who am I and What is NCat? ~
My name Nick Kibre, and I'm an N-Scale trolley modeller.
NCat stands for N (scale) Cat(enary), and is an informal group of modelers dedicated to modelling electric railways--trolleys, interurbans, heavy electrification, light-rail, rapid transit, mining, whatever--in N Scale, with live (as in, actually used to power the models) overhead.
This branch of the model railroading hobby is definitely not one where you can just go down to your local hobby shop and buy something that's ready to go. It takes a bit of ingenuity and a desire to do it yourself.
It may not be easy, but it can be done! Follow this blog and watch me try!
If you want to learn more about N scale traction modelling, see the official NCat website, or join our Yahoogroups Discussion List.